| Making Shoes | |
| Page 4 | |
| |
| |
 |
| |
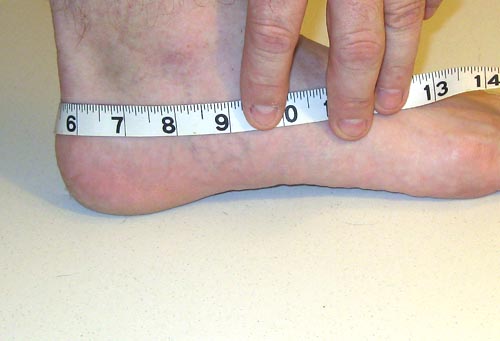
| The 3rd and last piece you will need to pattern for is the quarter. This is the piece that comes around behind your heel. The sole goes under your foot, the vamp goes over it and the quarter goes behind it. The quarter is a near rectangular piece that should come up to just below your ankle and go from the outside of the vamp around your heel and back to the inside of the vamp. You will want to measure just 2 more things to pattern the quarter; the height of your ankle and the distance around your foot from one side of the vamp to the other. |
| |
To measure the height of your ankle, stand on a hard, flat surface either barefoot or with a sock on. With a ruler, measure from the floor up to the bottom of your ankle, or the desired height of the shoe.
|
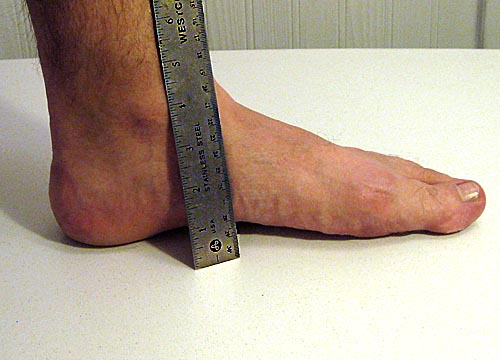 |
This will be the height of your rectangle, and the height of the back of your shoe. If you want something more slipper-like, make it a little shorter. If you want your shoe a little more boot-like, make this measurement a little taller. For the width, some people would say to just make it 9 inches long and run with it. I think it would be better to put your foot back on the pattern and with a cloth tape measure, record the length from the rear arch line around the back of your heel to the rear archline on the other side. For safety sake, we'll add an inch to this measurement. When we stitch it all together, it will be a lot easier to remove an extra inch of leather than to try to stitch in another little 1/2 inch piece. For my shoes, the measurement is 3 X 9 inches, so I will cut the quarter 3x10 inches. |
|
 |
| Notice above where I said it was a near rectangular piece? We want the top of the quarter to be just a little shorter than the bottom, by about 1/4 inch total. We do this so that when we stitch the vamp to the quarter, it pulls the top of the quarter over the heel ever so slightly, fitting the shoe nicely onto the heel without irritating the foot at the Achilies tendon. |
|
|
|
|
|
|
|
|
|
Draw this out on your card stock making sure the top and bottom are parallel, and that the bottom corners are just a little pointy. Go ahead and cut out your quarter pattern piece, and set it over with your sole pattern piece. |
| |
| |
| To finish your Vamp pattern, make a line 90 degrees from the end of your outside line at the rear arch mesurement. This line should be the same length as your ankle height measurement. In my example above, it should be 3 inches long. Don't worry if it looks like it's coming in at a strange or uneven angle, everyone's feet are different. Mark these height measurements on both sides of the shoe. When done, go ahead and cut out this out. You don't need to worry too much about the area right between these height marks, as you will probably have you cut some of this out later to have room for your foot to slide into the shoe. |
|
Now that you have all your paper pattern pieces, you will want to transfer these patterns to vinyl or very stiff cloth so you can make a test or "mock up" shoe to see how well it fits. We want to make this mock up so that if we need to make little adjustments, we can do it on the relatively easy to work with and less expensive materials. When transfering the pattern, be sure to think about if your pattern is for a left or right shoe, and what is going to be the inside and the outside of the shoe. It's called a turnshoe because we construct it outside-in, then turn it outside-out to help protect the stichting. When we construct the actual shoe out of leather, the grain side (pretty side) of the leather will all be in, and the flesh side (suede side) will be out where we can see it as we work with it.
On the next page we will discuss sewing together the mock up shoe. |
| |
| Next...page 5 (Doesnt's exist yet, Sorry!) |
|
|
|
|
|
|
|
|
| |
| Please be sure to see the Pictures section for some samples of my work. | |