| Updated 5-22-2006 | |||
|---|---|---|---|
| Making Chain Mail | |||
| (Becoming a Lord of the Rings) | |||
|
|
|||
In it's most basic form,
chain mail is constructed of many small interlocking rings. Historically, metal was
beaten and pulled or drawn into wire. The wire was twisted around a rod or mandrel to
give it a nice round shape. This coil, sometimes called a spring, was removed from
around the mandrel and the individual rings were cut from the coil. The tips of the
rings would be beaten flat and have a hole punched through them. 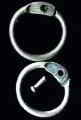 The rings would be assembled into a desired pattern and then rivetted closed. They would usually be woven into a 4-in-1 or 6-in-1 pattern, meaning that each ring would have either 4 or 6 other rings passing through. 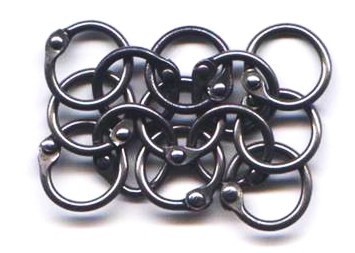  The type of mail we will be making is called butted mail, due to the ends of the rings being butted up against each other, not joined. Riveted mail is the example on the left, butted mail is on the right. |
|||
| Getting Prepared | |||
This section is designed to help you get started making chainmail using the "classic"
4-in-1 pattern. The tools and supplies needed are minimal. A person can get started
making chainmail for under $20.00. tools and supplies needed:
To get started, you will need to prepare a mandrel. Through the dowel rod, drill a hole slightly bigger around than your wire about an inch or two away from one end. This will hold the wire in place while it is being wrapped around the mandrel. You will need a different mandrel for each size (interior diameter) of ring you will be making: 7/16ths, 3/8ths , 5/16ths. You will be using a wooden mandrel to start, but later you will definately want to get a metal rod. The metal ones tend to not break when spinning rings, especially later if you use a power drill to wind the coils quicker! |
|||
| Making Rings | |||
|
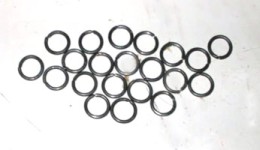
Start wrapping the wire
around the rod very tightly. The tighter and closer the wrapping job, the more
consistant shape the finished rings will have (insert picture). When just starting,
only try to wrap about a dozen times around or so. As you get a feel for it, you can
wrap longer coils. Snip both ends of the wire . Slide the coil off the mandrel. Pick
a spot at one end of the coil and start snipping through the wire one piece at a time.
Try to cut in as straight a line as you can. It is hard at first, but after a while
you'll develop the forearm muscles to cut more easily. I've been cutting rings this
way for 3 or 4 years now, and I still can't cut through 2 rings at a time. Take
your time. Repeat this process until you have about 50 or so rings. Later, you will
probably cut hundreds of rings at a time, but 50 will do to get started. Take about 1/2 the rings and open them a little so you can easily fit a thickness of wire between the ends of the ring, about a quarter inch. Take the other half of the rings and close the gap between the ends completely. You will need to push the ring ends just past each other so that when they spring back, they end up lining up just exactly where you want them to. | |||
 |
 |
||
|
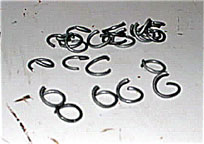
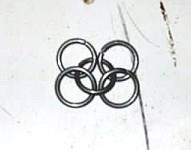
It is
important to get good closures so the chain is strong, the rings don't disconnect, and
there is less chance of the rings snagging on other rings, clothing or hair. When you have two piles of rings, one open and one closed, you are ready to start making "frogs". I've also heard these called "4's" and "quartets". Take one open ring, and put 4 closed rings on it, then close the open ring. You should end up with a set of 5 rings that looks like this: | |||
 |
 |
||
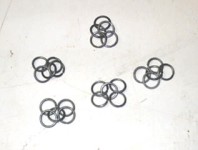
| Make sure you get a good closure on this ring, too. Make 7 or 8 of these "frogs" to start out, and put them in a pile. In the next section, we will join these sections together to make long chains of rings that start looking like Chainmail. | |||
| Weaving Rings | |||
|
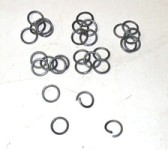
Gather your pile of Frogs and an equal amount of openned single rings.
Take one of your Frogs and press it between your fingers so that it looks
kind of like an "X". The outer four rings will be pointed to the
left and the center ring will be pointed to the right. Loop one of your
single rings through the "inside" of the upper two rings on your frog. It
should end up pointing the same direction as your center ring on the Frog.
Turn the openning on this single ring so that it points to the left. Take
another Frog and make an "X" out of it, too, pointing it the same
direction as the first one. Loop the single ring through the inside of
the 2 rings on the right side of new Frog. Now, close the single ring so
that the ends match up as closely as possible. You may need to push the
ring ends just past each other so that when they spring back, they
end up lining up just exactly where you want them to. (need more pictures
here) | |||
 |
 |
||
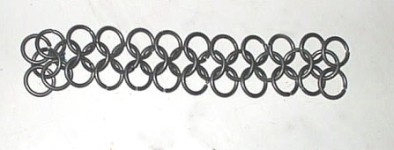
|
It will take a little practice, but soon you'll be joining 10-20 frogs a minute! Once you have a strip of rings that is "long-enough", make another one just like it. If your first strip was 5 Frogs, grab another 5 Frogs and do it again. Now that you have 2 identical strips, we will join them together to start making chain mail "fabric". Start by laying out the strips side by side so that the outer rings all point the same direction. Grab a bunch of single rings equal to the number of rings on the outside of your strips. If you used 5 Frogs, you'll need 10 open rings. Take one open ring and loop it through the bottom 4 rings of your strips, 2 on the left and 2 on the right. Loop it "up" through the right and "down" through the left. Close this ring. Take another single ring and loop it the same way, but this time through the top 2 rings you just joined, and the 2 rings above them. Again, you will be looping through 4 rings total. Close this ring, too. Continue this process until you've completely joined both strips. See photos below. (insert pictures) You can make the initial chains as long or as short as you like, and the fabric as wide as it needs to be to meet your needs. This is process will make rectangular pieces, suitable for making chainmail shirts, with the appropriate pattern. In order to make curved or domed pieces, you will need to use something called the expanding ring method. The reverse of this is the contracting ring method. All this does is allow you to join sections of mail is such a way that the finished fabric assumes a curved or circular shape, like your head.  In theory, the process is quite simple. Instead of joining your chains 2 rings to 2 rings, you join selected sections 2 rings to 3 rings, or 3 rings to 2 rings. Simple? It is. If you want a loose curve, you may decide to only join 2 rings to 3 every 3 |
|||
| Please see below for other resources for learning to make chainmail and armor. | |||
|
|
|||
Please be sure to see the Pictures section for some samples of my work. All that talent and I never had a lesson! |
|||